In this day of containerized workloads having a development or testing lab, using a IoT cluster could be a good use for a faction of the desk space. Running a Debian (Raspbian) on a mix of Raspberry Pi’s and Odroid C1’s I have successfully spun up a Docker Swarm cluster and have Portainer running on it.
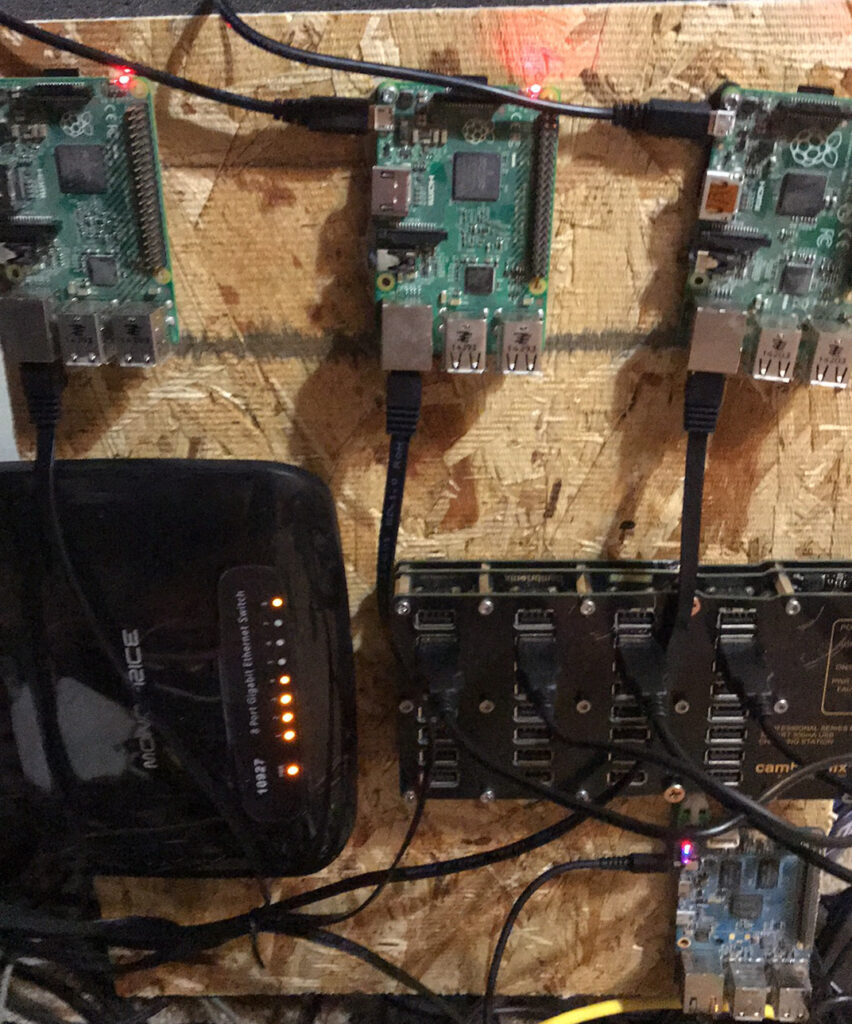
Inventory of Hardware:
- 2x Raspberry Pi 2
- 1x Raspberry Pi 1b
- 1x Odroid C1
- 1 8port Gig Switch (https://www.monoprice.com/product?p_id=10927)
- 1 32 Port USB power station
First step for my setup was getting a board to my inventory all on a single space and wired together. I could have made presentation smaller by stacking them, but I wanted to be able to see each one individually. I may change from the board to a stack at a later date to save even more space. (see below)
Second step for me was to get all the images loaded up on the SD Cards. I went with the latest Raspbian for each of the respective models. Which turned out to be Debian 10 (Buster) for all 3 types. But I would suggest you look up your specific models of IoT to see what the latest (and you are most comfortable with) version of Linux. Most have a Docker service that will support Docker Swarm.
Next step would be to SSH to the node you are classifying as the “Master” or “Leader of the swarm and run the following command: docker swarm init this will create the docker swarm cluster and output the command you need for the rest of the IoT devices.
After that step you will want to SSH into each of the additional IoT devices and run the join commands that were outputted in the above step that will join all the IoTs to the Docker Swarm Cluster. You should be to run the command: docker node ls which should output all the nodes that you have added and show you their status.
Final step for this post is loading up Portainer service. On the Leader Node create a yaml file with the below data: (This has to be done on a leader node, docker service commands cannot be executed on worker nodes)
version: '3.2'

services:
  agent:
    image: portainer/agent
    volumes:
      - /var/run/docker.sock:/var/run/docker.sock
      - /var/lib/docker/volumes:/var/lib/docker/volumes
    networks:
      - agent_network
    deploy:
      mode: global
      placement:
        constraints: [node.platform.os == linux]

  portainer:
    image: portainer/portainer-ce
    command: -H tcp://tasks.agent:9001 --tlsskipverify
    ports:
      - "9000:9000"
      - "8000:8000"
    volumes:
      - portainer_data:/data
    networks:
      - agent_network
    deploy:
      mode: replicated
      replicas: 1
      placement:
        constraints: [node.role == manager]

networks:
  agent_network:
    driver: overlay
    attachable: true

volumes:
  portainer_data:
After you have created the yaml file run the command: docker stack deploy /c portainer.yml management to create the new Portainer service. Give it a minute or 5 (depending on your internet speed and IoT power) to pull the Docker images down from Docker Hub and start the service. After a period of time run docker service ls to see the status of the docker service. You should see something like the below:
pi@Docker1:~ $ docker service ls
ID             NAME                   MODE         REPLICAS   IMAGE                           PORTS
4ff7hmvm8hqe   Management_agent       global       4/4        portainer/agent:latest
imoa5784pdi9   Management_portainer   replicated   1/1        portainer/portainer-ce:latest   *:8000->8000/tcp, *:9000->9000/tcp
Please note that the Replicas are showing the same number on both sides of the slash: 4/4 for the agent service. Once all the replicas for the Portainer service are showing up you will be able to log into the Leader node on port 9000: http://192.168.0.10:9000 (for example). The first time you pull up the page you will be promted to set an admin user and password, once these are set you will be shown the Portainer dashboard where you can manage your Docker Swarm Services and Containers.
For the next post we’ll talk about automation Docker Swarm deployments with Fedora CoreOS on AWS.